Introduction:
Picture this: It’s the day before Thanksgiving, and you’re knee-deep in pie crusts and stuffing prep. You reach for that trusty roasting pan… and it’s nowhere to be found. Sound familiar? Don’t sweat it! We’ve all been there, scrambling through cabinets like treasure hunters. But guess what? You don’t need a fancy roasting pan to pull off a mouthwatering turkey. With these roasting pan alternatives, your holiday feast will still be the talk of the table.
I remember one year when my roasting pan mysteriously vanished—turns out, it was hiding in the garage from last year’s cleanup. Panic mode activated! But I improvised, and the turkey turned out even better. If you’re in the same boat, keep reading. These tips will save your sanity and your dinner.
Who says you need specialized gear for a perfect roast? Let’s dive into why ditching the roasting pan isn’t the end of the world.
Why a Roasting Pan is Great (But Not Essential)
A traditional roasting pan is like the VIP of kitchen tools—big, sturdy, and designed to handle that massive bird with ease. It usually holds up to 20 pounds of turkey, catches all those juicy drippings, and often comes with a rack for even cooking. Plus, it’s oven-safe to high temps, making it a go-to for holiday roasts.
But here’s the kicker: Most home cooks only dust it off once a year. And if your turkey is on the smaller side (say, 10-15 pounds), you can totally skip it. Why clutter your cabinets with something you barely use? These roasting pan substitutes are everyday items you probably already own. They’re budget-friendly, easy to clean, and just as effective for getting that golden, crispy skin.
Question for you: How often do you really use your roasting pan? If it’s gathering dust, these hacks might make you rethink buying a new one.
Top Roasting Pan Alternatives for Your Turkey
Ready to get creative? Here are seven genius roasting pan alternatives that’ll have your turkey roasting like a champ. I’ve included pros, cons, and quick tips for each. Remember, always double-check that your chosen dish is oven-safe—safety first!
1. Disposable Aluminum Pans: The Quick Fix
These are the unsung heroes of last-minute cooking. Grab one (or two for sturdiness) from the grocery store for just a few bucks. They’re lightweight, disposable, and perfect for containing drippings without the cleanup hassle.
Pros: Cheap, no washing up, easy to find.
Cons: Might bend under heavy turkeys, so double up.
Tip: Line it with foil for extra support. I once used these for a 12-pound bird, and it was a breeze—no leaks!
If you’re stocking up on kitchen essentials, check out our Pyrex collection for more durable options.
2. Crock-Pot Insert: Your Slow Cooker’s Secret Side Gig
Got a crock-pot? Pop out the ceramic insert—it’s oven-safe up to 400°F in most cases. The tall sides keep juices in, and it’s great for smaller turkeys.
Pros: Deep sides prevent splatters, even heat distribution.
Cons: Skin might not crisp as much due to moisture.
Tip: For crispier skin, finish under the broiler for a few minutes. Imagine your slow cooker pulling double duty—talk about a multitasker!

This hack saved my holiday when the power went out mid-prep. Transitional phrase: Speaking of versatile tools, let’s move to something more rustic.
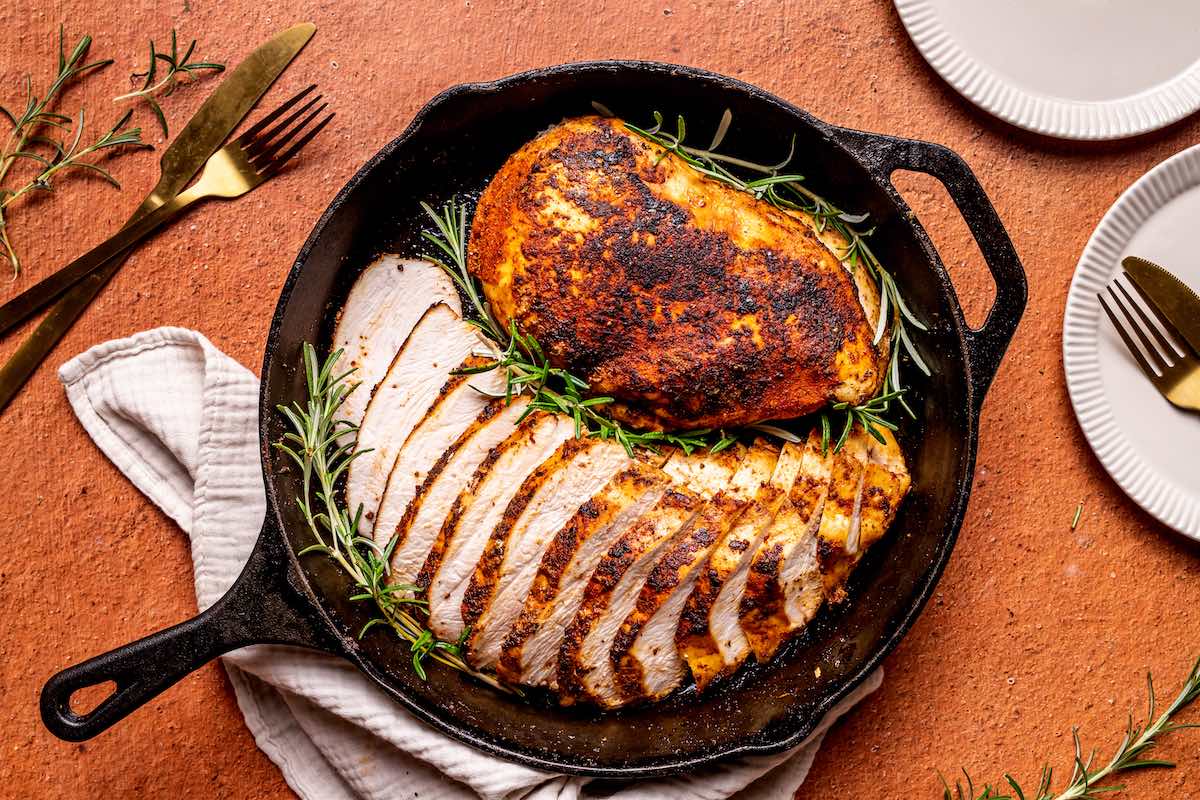
3. Cast Iron Skillet: Old-School Charm
A cast iron skillet is like that reliable friend who’s always there. Use one for smaller birds or turkey breasts. Ensure the handle is metal, not plastic.
Pros: Excellent heat retention, adds flavor.
Cons: Shallower sides mean more basting.
Tip: Elevate the turkey on veggies to let drippings flow. Ever tried this? It’s like giving your turkey a flavor spa day.
For more cookware ideas, browse our cookware lids.
4. Large Casserole Dish: The Everyday Hero
Your go-to Pyrex or glass baking dish (like a 9×13) is probably the most common substitute. It’s deep enough for drippings and bakes evenly.
Pros: Already in your kitchen, easy to clean.
Cons: Avoid rapid temperature changes to prevent cracking.
Tip: Let the dish warm to room temp before popping in the oven. I love using my glass baking dish with lid for this—doubles for storage later.

What if you have a bigger bird? Stack two dishes or go for a deeper one.
5. Stainless Steel Skillet or Sheet Pan
Similar to cast iron but lighter. Use a deep skillet or rimmed sheet pan lined with foil.
Pros: Quick heating, versatile for other meals.
Cons: May need frequent drippings removal.
Tip: Create a foil tent for even cooking. Funny story: I once used a sheet pan, and the turkey looked like it was sunbathing—golden all over!
6. Borrow from a Neighbor or Use a Dutch Oven
Simple yet effective—ask around! Or use a Dutch oven for enclosed roasting.
Pros: No cost, builds community.
Cons: Might not fit large turkeys.
Tip: Line with parchment for easy release.
7. DIY Foil Pan: When All Else Fails
Fashion one from heavy-duty foil. It’s makeshift but works.
Pros: Custom size, super cheap.
Cons: Not as sturdy.
These alternatives prove that creativity wins in the kitchen. Which one will you try first?
Essential Tips for Roasting Success Without a Pan
Now that you’ve got options, let’s nail the basics. These tips ensure your turkey turns out juicy and delicious, no matter the setup.
- Always verify oven safety: Check manufacturer guidelines.
- Use a veggie bed: Onions, carrots, celery—it’s like a natural rack.
- Monitor temperature: Aim for 325°F, 13-15 minutes per pound.
- Baste regularly: Keeps things moist.
- Rest the turkey: 20-30 minutes post-roast for juices to settle.
Think of your turkey as a star performer—the right stage (alternative pan) makes all the difference. And hey, if things go awry, laugh it off. Holidays are about fun, right?
For more kitchen wisdom, visit our guide on finding the right lid.
A Foolproof Simple Roast Turkey Recipe
No roasting pan? No worries—try this easy recipe adapted for alternatives.
Ingredients:
- 10-15 lb turkey
- Salt, pepper, herbs
- Butter or oil
- Veggies for base
Steps:
- Preheat oven to 325°F.
- Pat turkey dry, season inside and out.
- Place on veggie bed in your chosen dish.
- Rub with butter, tent with foil.
- Roast until internal temp hits 165°F.
- Rest and carve.
This recipe is like a warm hug—simple and satisfying. I tweaked it last year, adding garlic, and it was a hit!
:max_bytes(150000):strip_icc()/ALR-56348-a-simply-perfect-roast-turkey-VAT-hero-4x3-c9eaf408d00a4cd89251ea856b1c317f.jpg)
For variations, check this simple roast turkey guide or the classic version from Food Network.
Common Mistakes to Avoid When Using Roasting Pan Substitutes
We’ve all had kitchen flops. Avoid these pitfalls for a stress-free roast.
- Forgetting to check oven safety: Glass can shatter—yikes!
- Overcrowding the dish: Give that bird space.
- Skipping the thermometer: Guessing leads to dry turkey.
- Rapid cooling: Let it rest slowly.
One time, I poured cold water over hot glass—crack! Lesson learned. Treat your dishes gently, like fragile friends.
Storing Leftovers Like a Pro
Turkey done? Time for leftovers! Use airtight containers to keep them fresh.
Tips:
- Slice and store in portions.
- Refrigerate within 2 hours.
- Freeze for up to 3 months.
Our 6-pc Pyrex set is perfect for this. Or try the 24-pc version for big families.
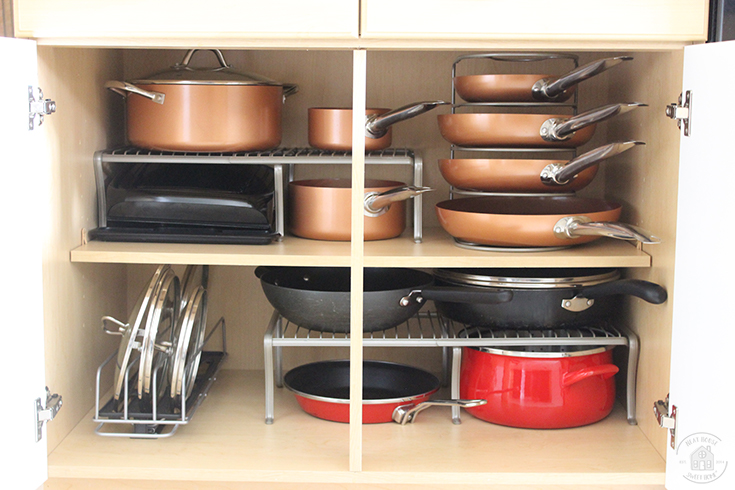
An organized setup makes post-holiday cleanup a joy.
Wrapping Up Your Thanksgiving Adventures
There you have it—roasting pan alternatives that turn potential disasters into delicious triumphs. From crock-pots to casserole dishes, these hacks prove you can roast a stellar turkey without the fancy gear. Your holiday table will be buzzing with compliments, and you’ll have stories to share.
Ready to upgrade your kitchen arsenal? Explore our Pyrex mixing bowl set or baking dish lids. For more inspiration, head to our blog home.
What’s your wildest kitchen hack? Drop it in the comments—I’d love to hear! Happy roasting!